How to Export Shopify Data: Products, Orders, Customers, Inventory

How to Export Shopify Data: Products, Orders, Customers, and Inventory
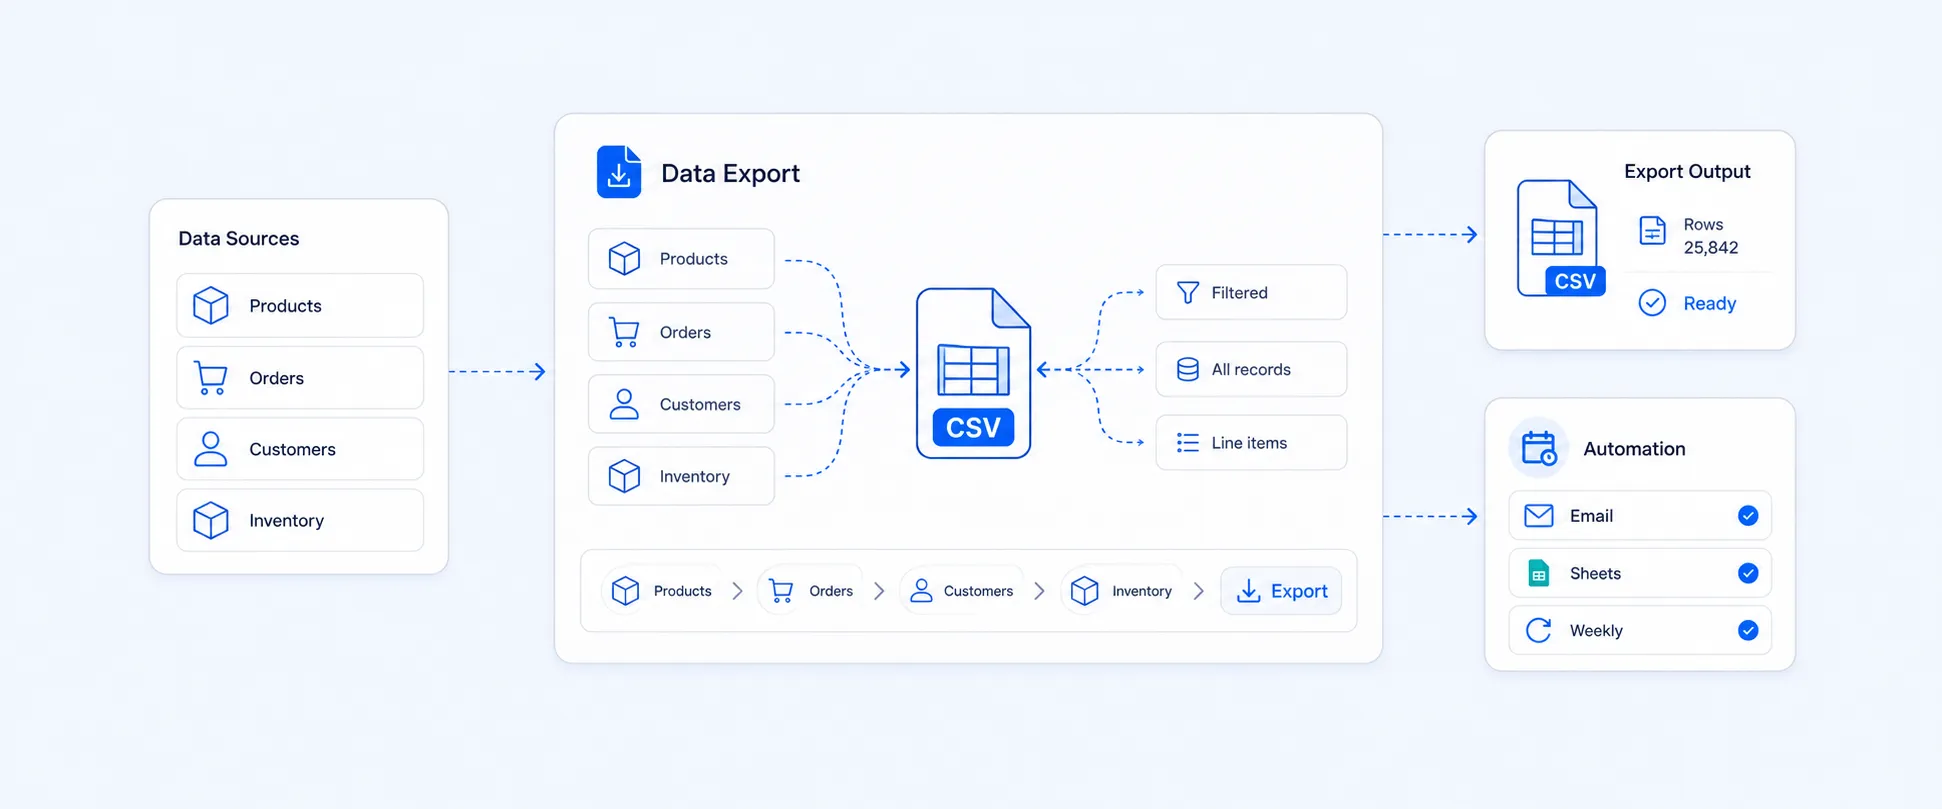
You canexport Shopify data natively from the admin: go to Products, Orders, Customers,or Products > Inventory, click Export, pick your scope, and Shopifygenerates a CSV. Small files download instantly. Larger ones get emailed to thestore owner. There's no single "export everything" button, socombining data across types means either a spreadsheet join or a reporting app.
Thisguide walks through each export type step by step, where the native workflowhits limits, and when it's time to automate instead.
Key Takeaways
- Products, orders, customers, and inventory are exported separately. Shopify does not provide a single “export everything” option.
- Orders with multiple items export as multiple rows, with each row representing an individual line item rather than one order.
- Customer exports include order totals such as spend and order count, but they do not include itemized order history.
- Inventory exports show current stock levels and transfer status, but do not include supplier purchase orders or incoming quantities.
- Exports with more than 50 records are usually emailed instead of downloading instantly, and larger exports can take minutes to hours.
- Native Shopify exports are manual one-time actions. There is no built-in scheduling option to automatically repeat exports.
How to export products from Shopify
Product exports cover your catalog itself: titles, descriptions, pricing, variants, and images. Merchants typically need this for catalog backups, migrating to a new platform, bulk editing pricing or tags, or feeding product data to another tool.
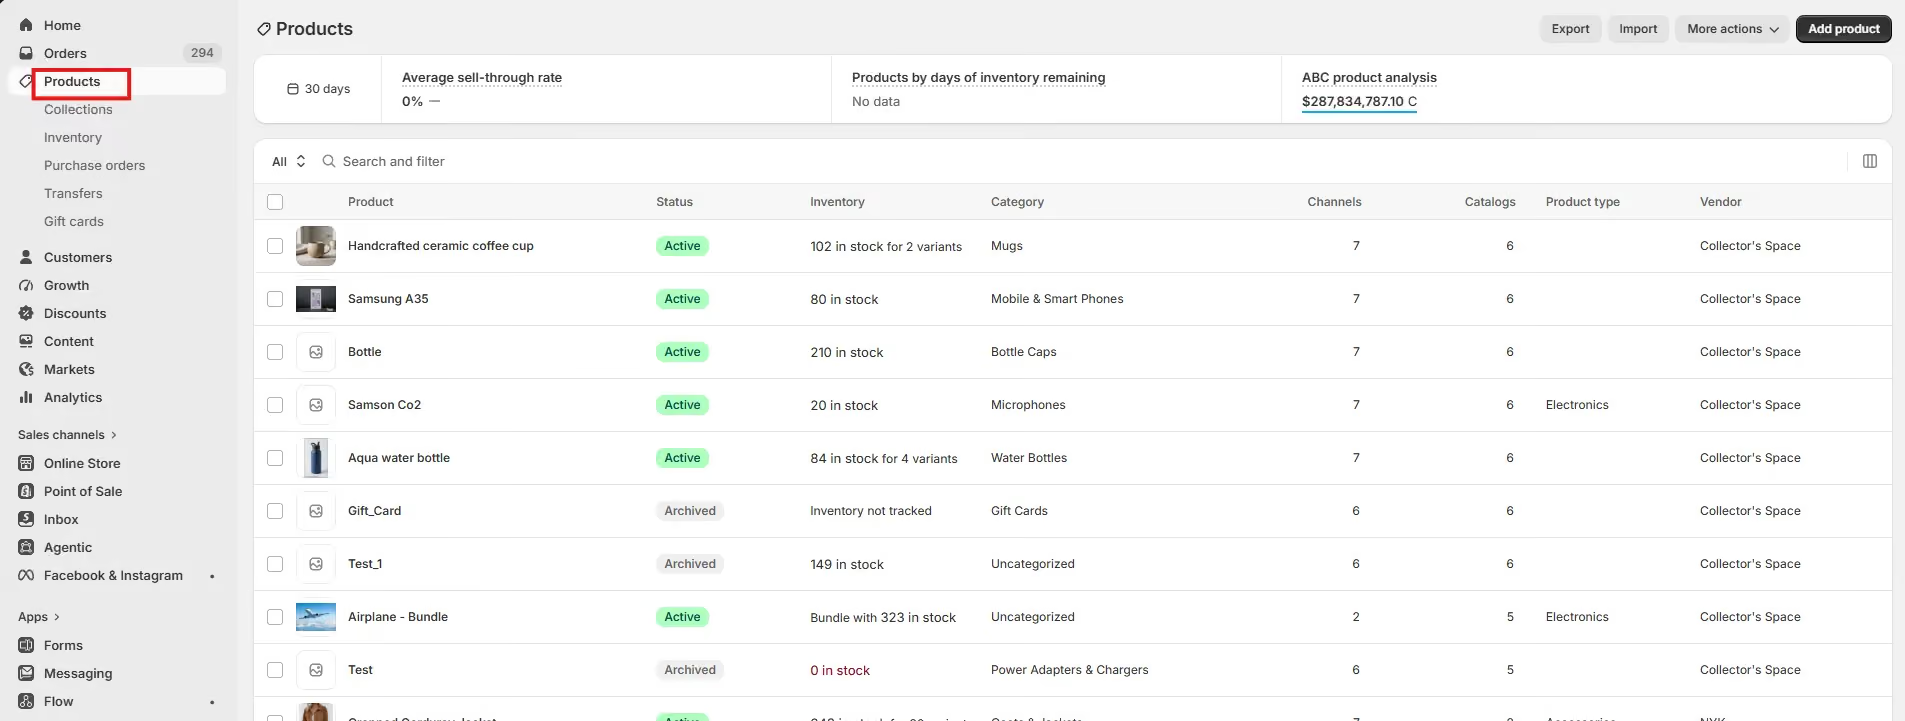
- From your Shopify admin, go to Products.
- Use the search and filter tools if you only want a subset (a collection, a vendor, products matching a tag) rather than your full catalog.
- Click Export in the top right.
- Choose what to export: the current page, all products, only the products you've selected, or everything matching your current filter.
- Choose a file format. CSV for Excel, Numbers, or other spreadsheet programs is the safer choice for most people, since it handles special characters more cleanly than opening the plain CSV directly.
- Click Export products.
Key fields in a products export:
- Handle
- Title
- Body (HTML description)
- Vendor
- Product Category/Type
- Tags
- Published
- Option1/2/3 Name and Value (for variants like size or color)
- Variant SKU
- Variant Price
- Variant Inventory Qty
- Variant Barcode
- Variant Cost
- Image Src
- SEO Title
- SEO Description
If you have a small catalog, the file downloads immediately. Larger catalogs get emailed to you instead. Product images are not included in the CSV either; only the image URLs are, since Shopify doesn't bundle image files into a product export.
If you're specifically trying to pull products together with their collections and images for a spreadsheet workflow, or you want a proper backup of your full catalog rather than a one-off pull, those are worth a closer look on their own. See exporting products, collections, and images to a spreadsheet and a smarter way to back up your product catalog.
How to export orders from Shopify
Order exports cover what was sold, to whom, and for how much: line items, pricing, addresses, and payment status. This is the data most people reach for when reconciling sales, sending order details to a vendor or warehouse, or pulling revenue figures for accounting.
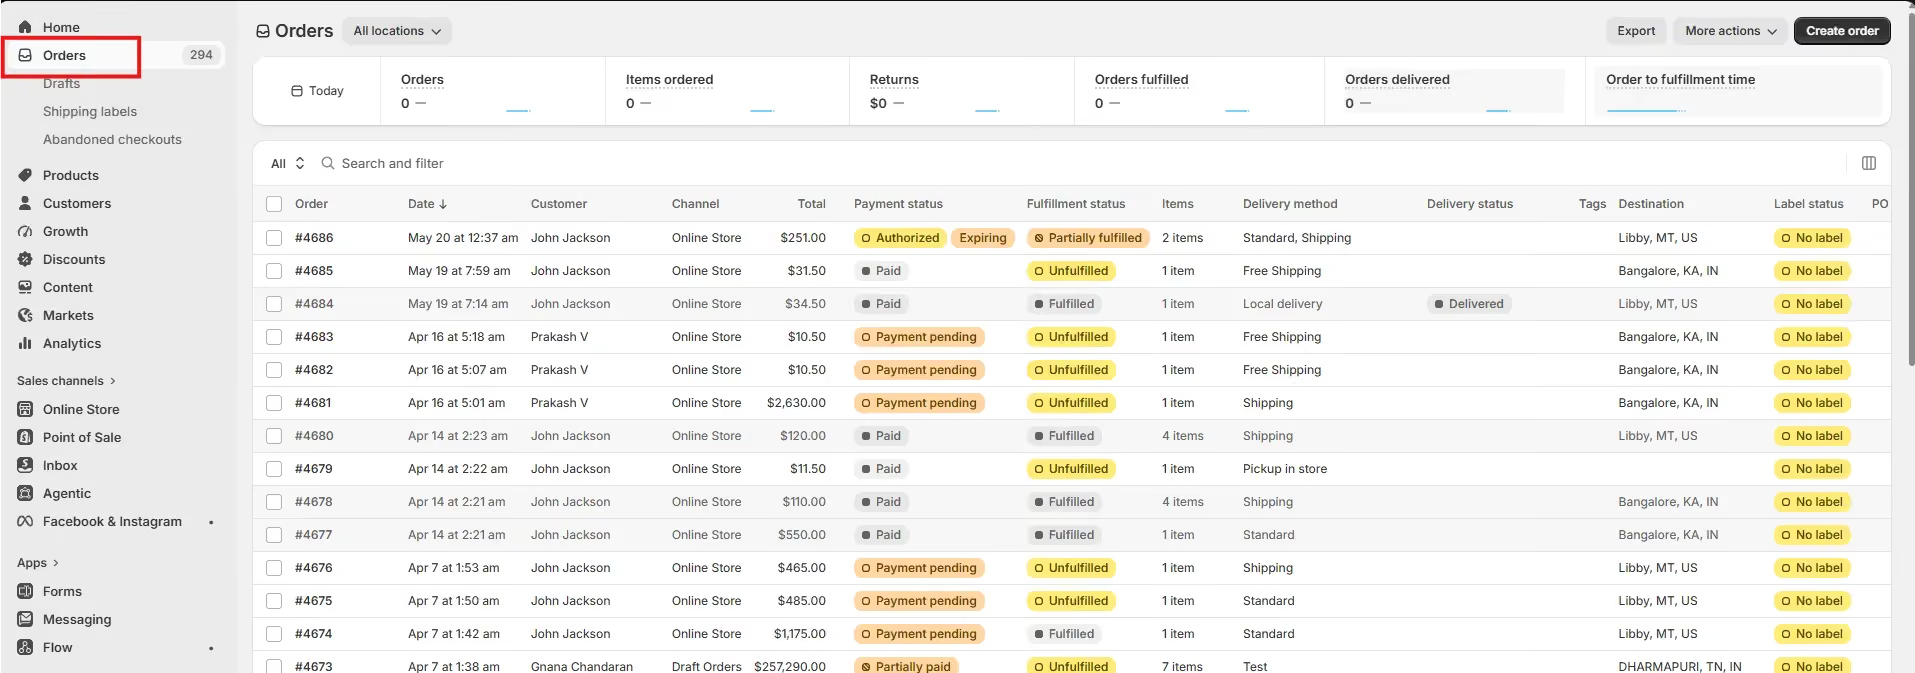
- From your Shopify admin, go to Orders.
- Filter by date range, status, or channel if you don't need every order ever placed.
- Click Export.
- Choose which orders to include: current page, a date range, or your filtered selection.
- Decide whether to include transaction history (captured payments only; authorization data isn't included).
- Choose your file format and click Export orders.
Key fields in an orders export:
- Name (order number)
- Financial Status
- Fulfillment Status
- Created At
- Lineitem Name
- Lineitem SKU
- Lineitem Quantity
- Lineitem Price
- Billing and Shipping Address fields
- Discount Code
- Shipping
- Taxes
- Total
- Tags
- Risk Level
- Source (web, POS, draft order)
Here's the part that catches people off guard: an order with three products in it doesn't export as one row. It exports as three rows, one per line item, with most order-level fields left blank on the extra rows to show they belong to the same order. If you're trying to total up order values in a pivot table afterward, this matters, since you'll double or triple count unless you account for it.
Export timing scales with volume. Shopify notes an export under 100,000 items can complete in under an hour, while something in the range of 400,000 items can take around four hours.
If you regularly need order data broken out by line item for merchandising or reconciliation, or you're exporting custom order data for vendors, warehouses, or an ops team rather than for yourself, those are covered in more depth in exporting Shopify orders with all line items and custom order exports for vendors, warehouses, and ops teams.
How to export customers from Shopify
Customer exports cover contact details, marketing consent, and spending summaries. Merchants pull this for email list management, segmenting by spend or location, or handing a customer list to an outside marketing tool.
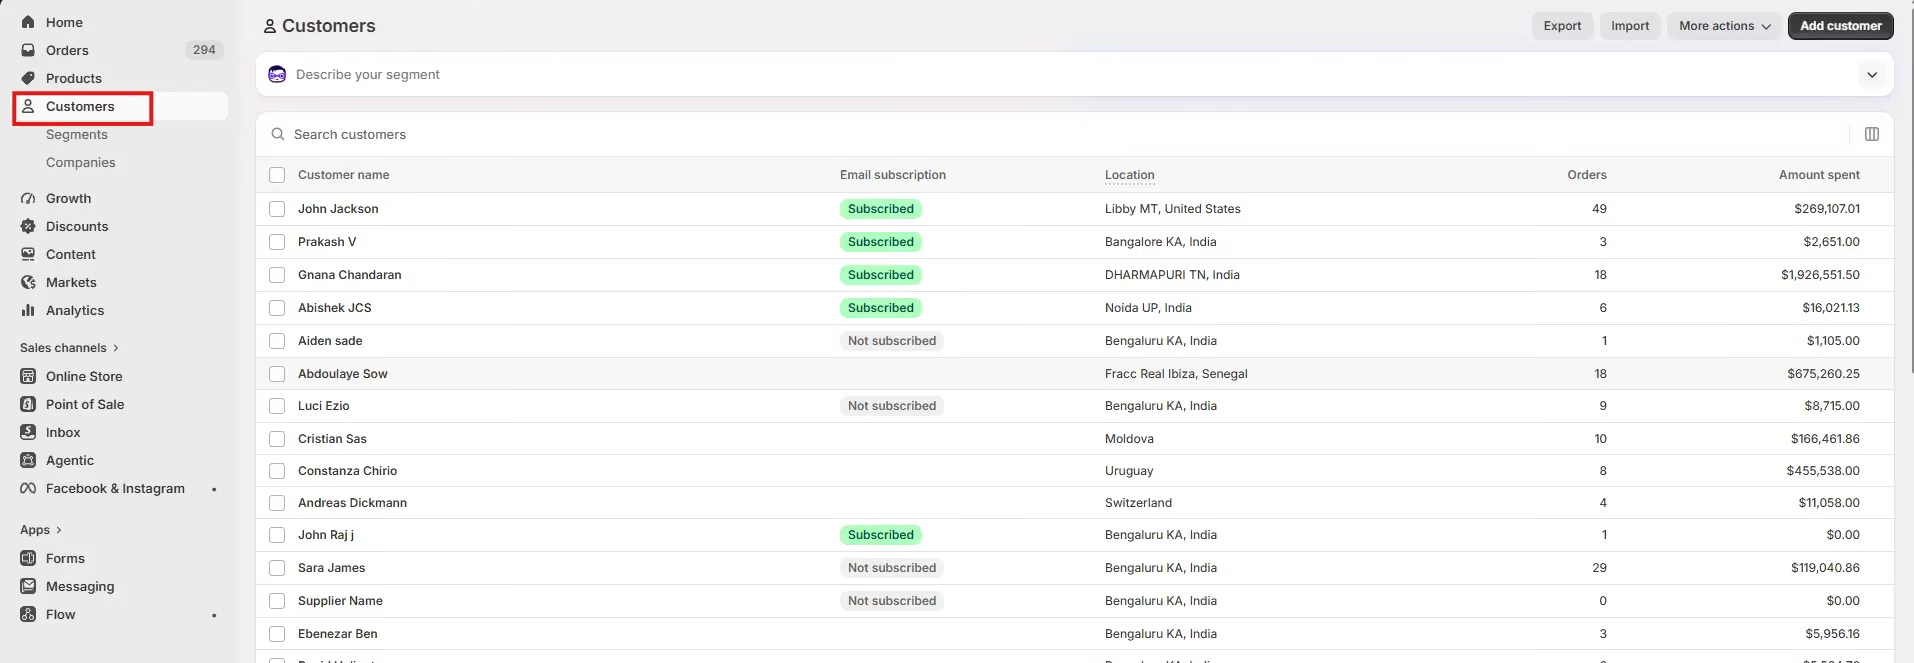
- From your Shopify admin, go to Customers.
- Optional: filter or search to narrow the list to a segment rather than everyone.
- Click Export.
- Choose the scope: current page, all customers, selected customers, or however many match your current filter/segment.
- Optional: check the boxes to include customer tags or supported metafields if you need them.
- Choose your file format and click Export customers.
Key fields in a customers export:
- First Name
- Last Name
- Phone
- Company
- Address1/2
- City
- Province
- Country
- Zip
- Accepts Email Marketing
- Total Spent
- Total Orders
- Tags
- Note
- Tax Exempt
The export includes names, emails, phone numbers, addresses, marketing consent, and summary fields like total orders and total amount spent. What it does not include is itemized order history. You won't see which specific products a customer bought from a customer export alone. For that, you need the orders export as well, matched back by email address.
If your goal is exporting customers by tag, segment, or purchase pattern into a single usable report, that specific workflow is covered in exporting Shopify customer data by tags, segments, and purchase history.
How to export inventory from Shopify
Inventory exports cover current stock levels by SKU and location. This is the one people reach for before reordering stock, doing a stock count, or checking for dead or low inventory across locations.
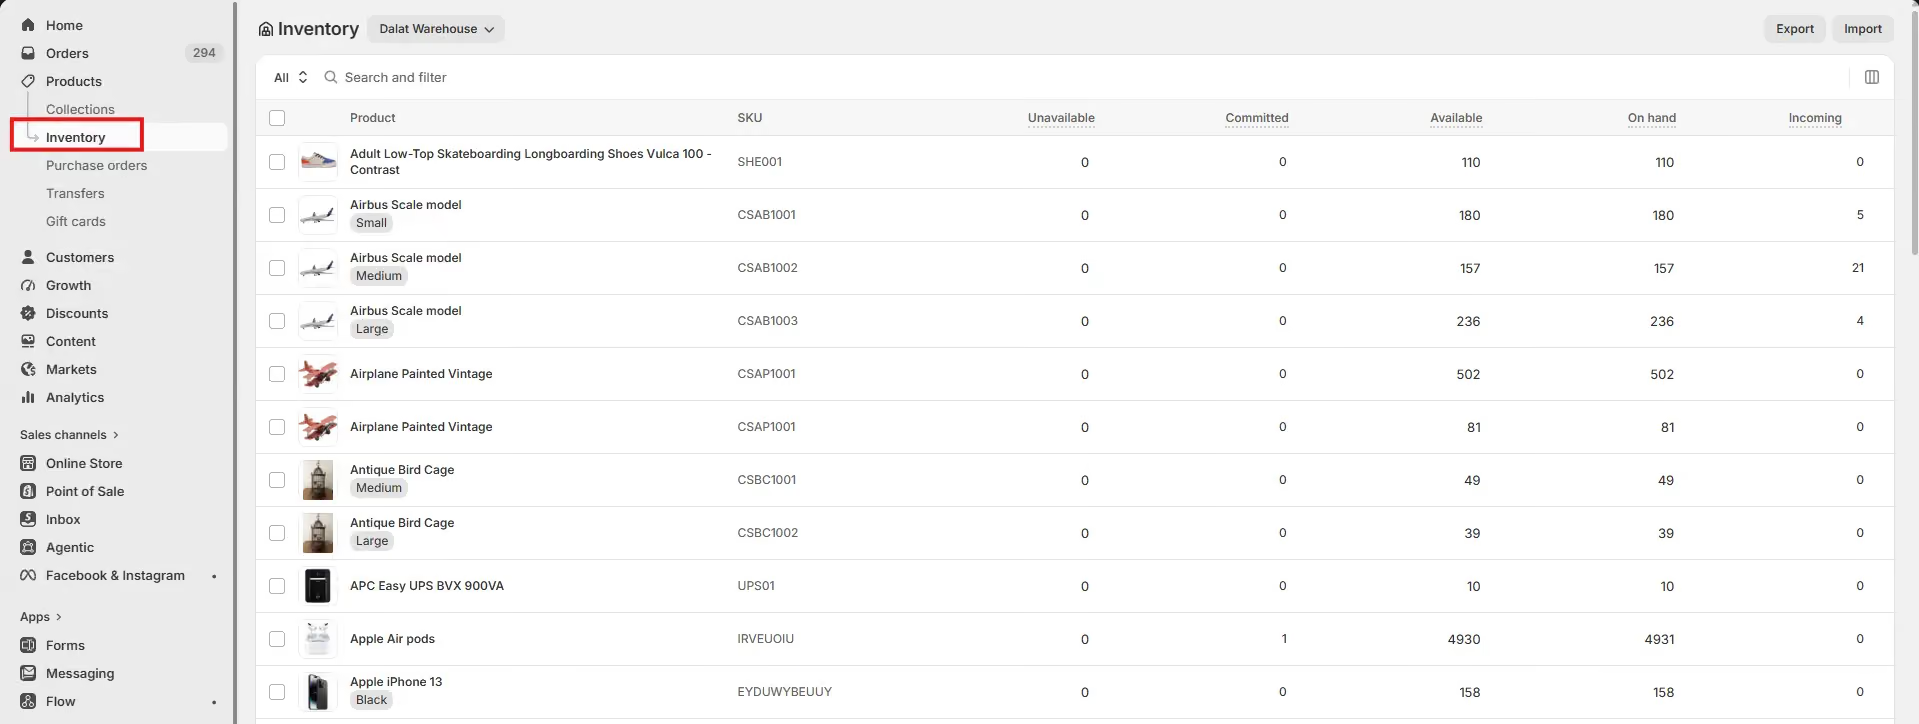
- From your Shopify admin, go to Products > Inventory.
- Click Export.
- Choose a location, or select all locations if you stock from more than one.
- Choose which inventory state to export: Available only, or All states (recommended, since it includes safety checks that prevent accidentally overwriting recent stock changes if you re-import the file later).
- Choose which variants to include: current page, all products, selected products, or a filtered set.
- Click Export.
Key fields in an inventory export:
- Handle
- Title
- Option1/2/3 Value
- SKU
- Location Name
- Available
If you choose All states, the file also breaks quantities out by state:
- Committed
- Damaged
- Incoming
- On Hold
- Quality Control
- Reserved
- Safety Stock
That "Incoming" column is worth a closer look, and it's also the source of some confusion. It reflects inventory in transit through Shopify's own stock transfers between your locations, not incoming quantities from a purchase order to a supplier. Purchase order data lives in a separate part of Shopify entirely and isn't included in this export at all, which is exactly the gap Shopify merchants raise most often: no export ties current stock, incoming transfers, and open purchase orders together in one file. This is a well-documented pain point among Shopify merchants; the common workaround is exporting products, inventory, and purchase order data as separate files and merging them manually in a spreadsheet by SKU.
For inventory broken down by collection, or for spotting dead stock and zero-sales SKUs specifically, see exporting and analyzing Shopify inventory by collections and exporting zero-sales SKUs to spot dead stock fast.
How do you export Shopify financial and analytics reports?
Beyond the four core data types above, Shopify also lets you export data from Analytics > Reports, including sales, taxes, and payment reports. Most reports export in CSV, Excel, or similar spreadsheet formats directly from the report screen; if you specifically want a PDF, you print the report instead of using the export option.
For transaction-level financial data specifically, the kind accountants and bookkeepers usually ask for, see transaction reports in Shopify: where to find and export them.
What can't you do with Shopify's native export?
Once you've exported a few times, the same limitations tend to show up regardless of which data type you're working with:
- No single export covers more than one data type. Need sales and inventory together? Two separate exports, merged by hand.
- Nothing is scheduled. Every export above is a manual click, every time. There's no native option to have a report land in your inbox automatically every Monday.
- Some fields simply aren't exportable natively, with incoming inventory and purchase order data being the clearest example.
- Files are CSV, not true Excel. Opening a CSV by double-clicking it in Excel can scramble special characters; using Excel's Data > From Text/CSV import avoids this, but it's an extra step most people don't know about the first time.
None of this means native export is broken. For a one-time backup, a quick check, or a small one-off pull, it does the job fine. The friction shows up specifically when the same report needs to happen again and again, or when it needs to combine more than one data source.
How do you combine multiple Shopify exports into one report?
If you've hit one of the limits above, the common fix is exporting each data type separately, say products and inventory, and combining them yourself in Google Sheets or Excel using SKU or email as the shared key. It works. It's also the same manual process every single time the report is needed again, which is fine occasionally and genuinely tedious monthly.
If Google Sheets specifically is your destination of choice, exporting Shopify data to Google Sheets for better reporting covers that workflow directly.
When should you automate Shopify exports?
A lot of the merchants we talk with at Report Pundit land here after doing the manual export and merge routine a few too many times, usually because they need the same combined report on a recurring basis, or because they need to hand a report to someone outside the store, like a vendor, warehouse team, or accountant, without giving that person direct access to the Shopify admin.
That's the specific gap Report Pundit is built to close: combining data across products, orders, customers, and inventory into one report, scheduling it to run automatically (daily, weekly, or monthly), and delivering it straight to an email inbox, Google Sheet, or shared destination, so the report simply shows up instead of getting rebuilt by hand each time. If you're already comfortable with native export and just need it to stop being a recurring manual task, that's the point where automating it tends to make sense.
FAQ's
How do I export all my Shopify data at once?
You can't. Shopify doesn't have a single "export everything" button. Products, orders, customers, and inventory are each exported separately from their own admin section, and combining them into one file has to be done manually afterward or through a reporting app.
Can I export Shopify data to Excel instead of CSV?
Shopify exports as CSV, not a true .xlsx file. Choosing the "CSV for Excel, Numbers, or other spreadsheet programs" format at export time makes it open more cleanly in Excel, but it's still a CSV file underneath.
Why does my exported orders file have multiple rows per order?
Orders with more than one line item export as one row per item, not one row per order, with shared order details left blank on the extra rows. If you're totaling order values, account for this before summing the file directly.
Can I schedule Shopify exports to run automatically?
Not natively. Every export from the Shopify admin is a manual action you repeat each time. Recurring, scheduled exports require a reporting or automation app.
Does exporting customers include their order history?
Only summary totals: total orders and total amount spent. Itemized purchase history isn't included in a customer export; you'd need to cross-reference the orders export by email address.
Can I export incoming inventory or purchase order data from Shopify?
Partly. The inventory export's "All states" option includes an Incoming field, but that reflects stock in transit between your own locations, not incoming quantities from a supplier purchase order. Purchase order data itself isn't included in any native export.
How long does a Shopify data export take?
It depends on volume. Small exports (roughly 50 records or fewer) download instantly. Larger ones are emailed to you, and can take anywhere from a few minutes to a few hours for very large stores.
Can I export only specific products, orders, or customers instead of everything?
Yes. Every export type supports filtering, whether by search, by selection, by segment, or by whatever's currently displayed on the page, before you click Export.

5.0 ( 2000+ Reviews)
