How to Track Your Shopify Inventory Adjustments Effortlessly

.svg)
.svg)
.svg)
When your physical inventory doesn’t match what Shopify shows, it becomes frustrating and stressful. A clear inventory report should help in maintaining accurate stock levels to prevent revenue loss, overstocking, or stockouts, and support better customer satisfaction through consistent product availability.
Shopify’s Inventory Adjustment report gives you detailed insight into stock movement and inventory value across all your locations. Whether adjustments are due to damage, loss, theft, or manual updates, this report highlights where changes happen and why. You’ll also discover how to customize the report and use Shopify’s features to improve accuracy and support efficient inventory management.
Video Walkthrough: How to track Inventory Adjustments in Shopify
Where Inventory Adjustments Are Saved in Shopify
Shopify does store inventory adjustments, but they are not directly visible in the Shopify admin. However, this data is available through the Shopify API and can be viewed for each product variant. Each adjustment includes important details such as the date, sales activity, returns, and transfers.
Shopify only lets you view adjustment history for one product or variant at a time, which can become time-consuming and difficult to manage as your inventory grows. If you need a single consolidated view of all adjustments across products or multiple locations, the default reporting falls short and makes analysis harder.
Adjustment history on product pages
Shopify offers an adjustment history log for each product and its variants, so you can analyse your stock movements. It’s a helpful way to monitor stock activity and understand what's the reason behind each adjustment.
Adjustment history on product pages is basically a record of data showing all the changes made to the product inventory level (sales, returns, removing products, adding inventories, purchasing orders, transfers, and shipments).
Steps to view the Inventory Adjustments history on a product page
- Log in to your Shopify Admin
- Product section > Inventory section
- Choose any specific product
- Click on – View Adjustment history

There are two kinds of Inventory Adjustment reports available in Shopify. That we’ll see in detail in the next topic.
- Shopify Inventory Adjustment Changes
- Shopify Inventory Adjustment Counts
Inventory Adjustment Changes report
The Adjustment Changes report in Shopify gives you detailed information about your inventory movements across all products and locations. It tracks inventory stock levels and the reasons for adjustments, such as sales, transfers, restocks, returns, manual updates, or damaged items.

This report gives you crucial insights on:
- Inventory adjusted in Shopify, along with the inventory app name
- Staff member names associated with the orders
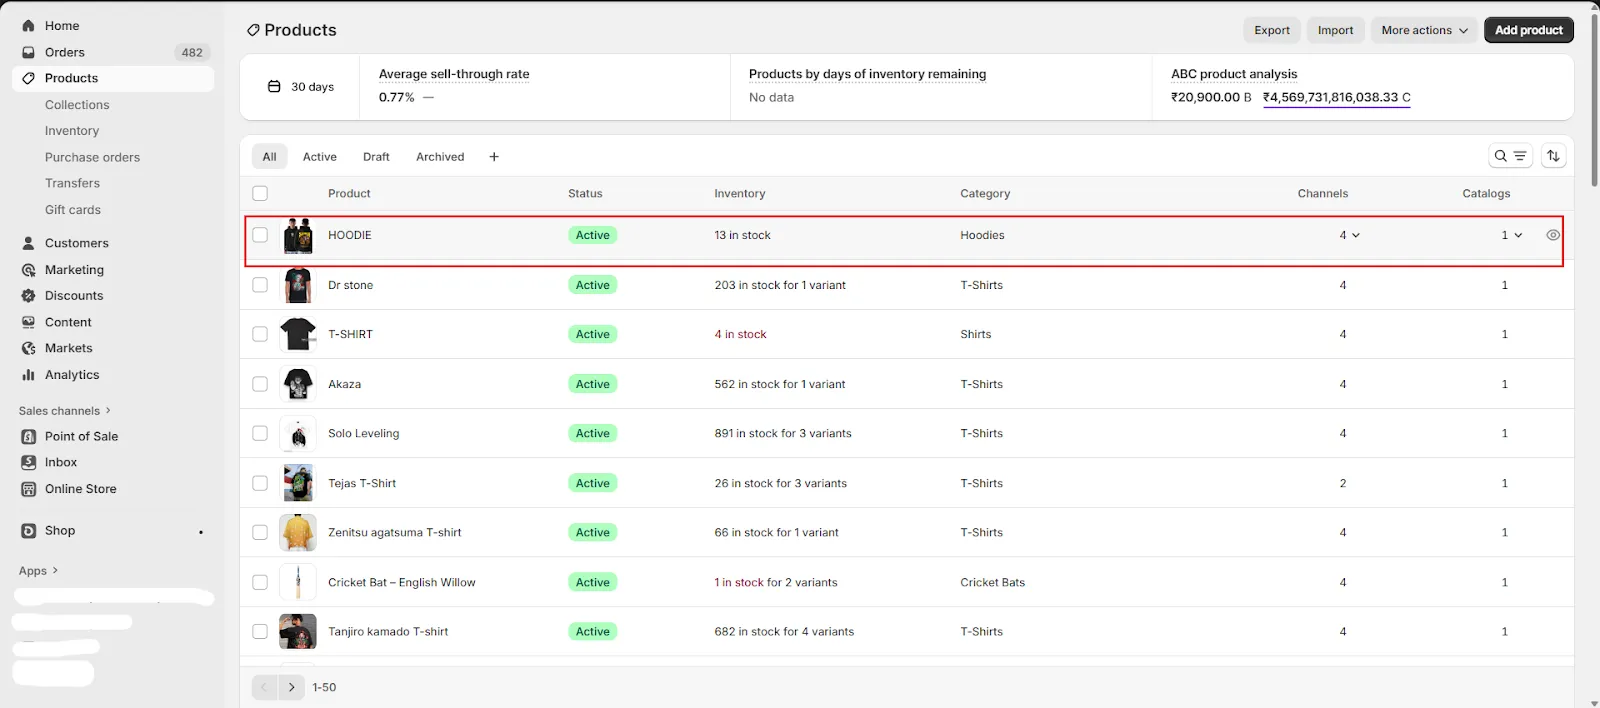
For multi-store or multi-location setups, Shopify’s basic reports can be limiting since they only show product-level data. With advanced apps, you get insights like collection performance, total stock levels, units sold, and customizable reports that make tracking and analysis more effective and easier.
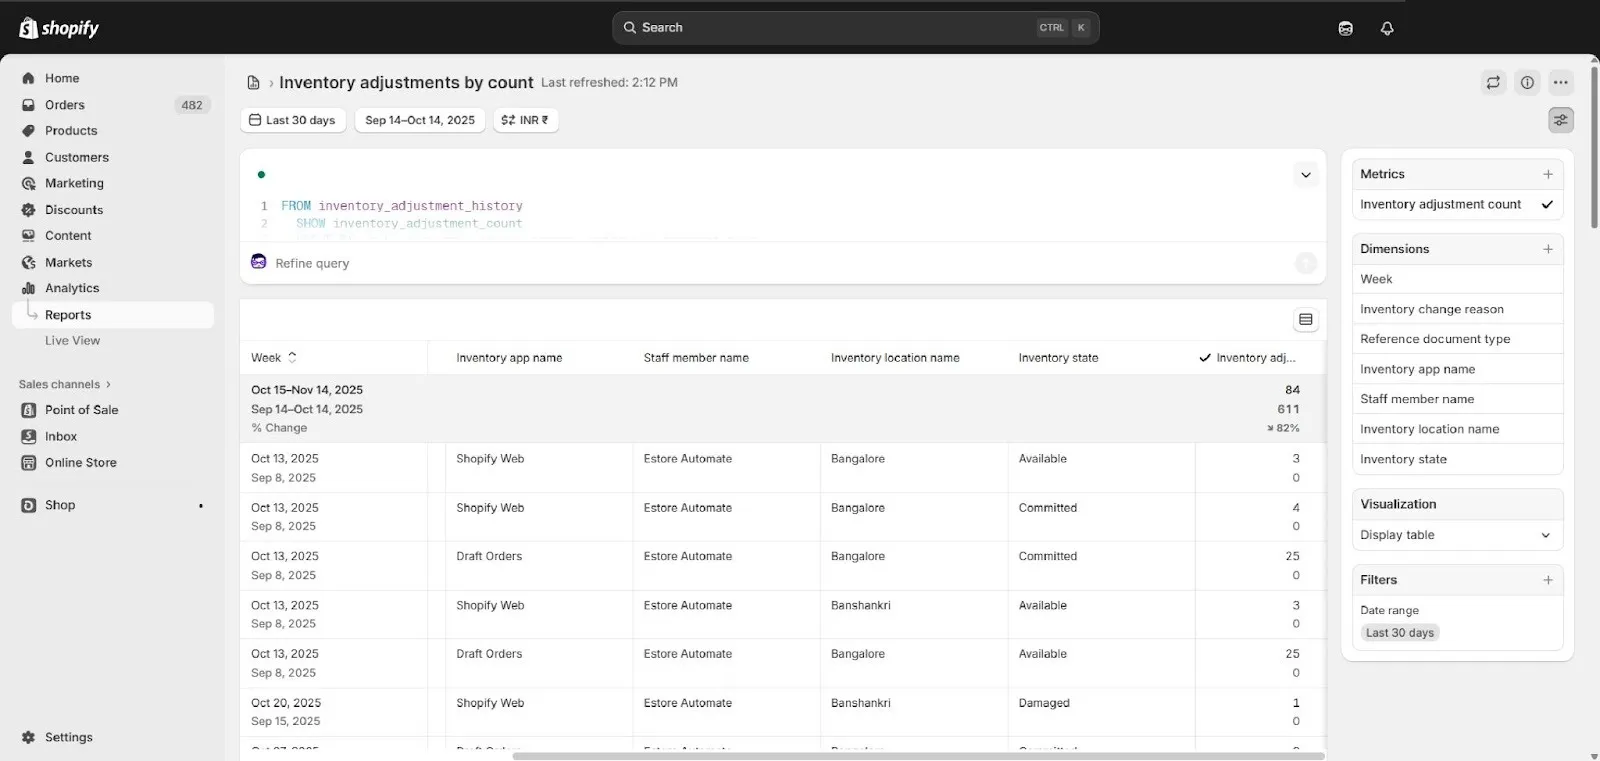
Inventory Adjustments by Count report explained
The Inventory adjustment by count report in Shopify gives you the number of inventories that have been adjusted. It helps your store by counting how many times an inventory item has been adjusted to find out the issues.
The report compares adjustment frequencies across time to see if accuracy is getting better or if any ongoing issues are still there that need to be fixed.
In Shopify, there are two ways to manage your inventory:
- Inside Shopify ( Inventory Management)
- Third-party inventory management
Managing Shopify Inventory is very simple and easy to use. It lets you track stock by recording all manual adjustments like damaged items, theft, expiry, and so on across locations.
You can use third-party inventory management apps like Prediko, Workmate, Veeqo, Stocky, etc. Shopify has moved its API into the Shopify admin, allowing Stocky users to access the transfer features from the app.
Adjustment Changes versus Adjustments by Count Report
Shopify Inventory Adjustment Changes and Adjustments by Count are two different report types related to the same inventory management and analytics. Here is a clear comparison between the two:
Can I see the Adjustments made by Third-party Apps
The standard adjustment reports are exclusive to Shopify’s admin changes. However, you can't see the full details, such as the reasons for third-party app inventory adjustments, but you can see the name of the app used to make the adjustments.
For detailed inventory insights, such as inventory value across locations, managing bundle inventory, inventory replenishments, low stock alerts, and other critical information that helps you monitor stock more effectively, you can try using the Report Pundit app.
How Stocky connects to inventory adjustment reporting
Shopify’s inventory management apps make it easier to track stock movement across multiple locations. Stocky, in particular, provides detailed insights into adjustments, transfers, and changes caused by damage, loss, or manual updates. All actions recorded in Stocky sync back to Shopify’s API, allowing you to access data such as location transfers, adjustment history, and shipment activity when needed.
How to View Inventory Adjustment History in Shopify (Step by Step)
Here is the step-by-step guide to view Shopify Adjustment History
- Log in to your Shopify Admin account
- Go to the Product section on the left side of the dashboard

- Select any specific product from the list
- Scroll down to the inventory page and click on the “View Adjustment History”

Note: If your store is in multiple locations, you can filter the location and view the data where adjustments were made.
Common Fields used in this report
Here are some of the standard and common fields used in Shopify Inventory Adjustments reports:
- Adjustment history: Show the Log of all stock adjustments made over time.
- Date: When the adjustment took place to your product inventory.
- Activity: Type of inventory actions taken (e.g., added, removed, transferred).
- Unavailable: Quantity temporarily not available for sale.
- Committed: Stock reserved for open orders.
- Available: Quantity ready for sale.
- On hand: Total physical stock at a location.
- Incoming: Stock expected from transfers or purchase orders.
- Inventory app name: App through which the adjustment was made (e.g., Stocky).
- Staff member name: A person who created or triggered the inventory change.
- Inventory location name: Store or warehouse where the adjustment occurred.
- Inventory state: Current condition or status of stock (e.g., available, in transit).
- Inventory adjustment by count: Quantity change applied during adjustment.
- Inventory change reason: Explanation for the change (e.g., damaged, returned, restocked).
- Inventory adjustment changes: Summary of before-and-after stock values for each adjustment.
Use cases of the Inventory Adjustment Report
One of our clients, A skincare brand, was looking for the Inventory adjustment report to view a breakdown of stock changes by SKU and location, quantity update, and available quantity after adjustment to understand reasons for the adjustments being made, i.e., expiry date, product leakage, or damage. We suggested that they need to use the Inventory Adjustment report in Shopify, which provides each record that contains essential references like order number, product variant SKU, and date, to easily track the inventory movement.
After exporting the report to CSV, they have circulated the report among the team for analyzing and coming up with better decisions for stocking and transfers. So basically, this report helps your store to avoid stockouts and overstock by keeping your inventory accurate for a happy store and happy customers.
Conclusion
Maintaining accurate stock levels is essential for revenue and keeping customers happy, and tracking inventory adjustments plays a key role in that process. Shopify’s native reports provide useful visibility into stock changes, and many merchants depend on the Inventory Adjustment report for decisions across locations and products.
The report includes Shopify and third-party inventory adjustments, but metrics like transfers, shipments, and purchase orders aren’t included, and you need to view them separately. Advanced apps like Report Pundit can combine this information into a more detailed view, making it easier to understand stock movement and work on trends.
Overall, this report is especially valuable for multi-location stores that want clear insights into staff activity and recurring adjustment reasons that help in improving accuracy, accountability, and operational decision-making.

Build and automate your
Shopify Reporting
Unlock the full potential of your Shopify store with Report Pundit.
Gain access to over 2000 data fields, automate reports, and make
data-backed decisions to grow your business.